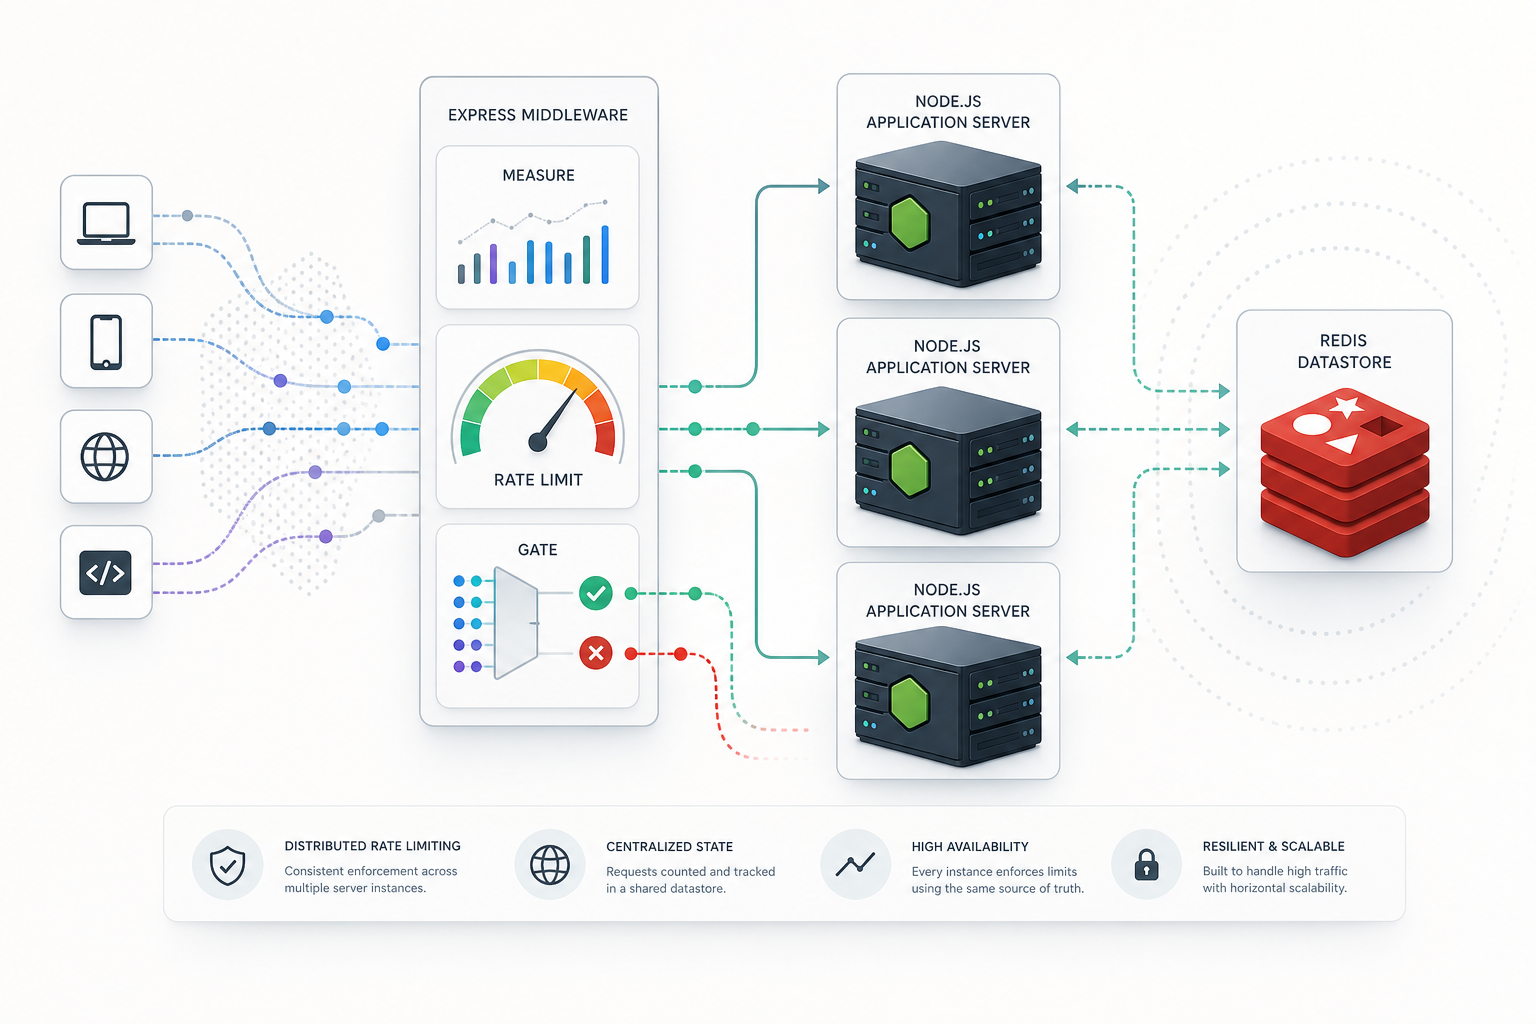
Why this problem matters
API rate limiting is not just a defensive control; it is an operational safeguard. Without it, a single noisy client, retry loop, scraper, or compromised token can drive up latency, exhaust worker capacity, and create uneven service for legitimate users. In distributed Node.js deployments, in-memory counters are usually not enough because each instance sees only part of the traffic.
In this tutorial, you will build a Redis-backed rate limiting layer for an Express API. The finished setup will let you apply a consistent request limit across multiple Node.js instances, return standard limit headers, and verify the behavior before you expose it to production traffic. If you are also designing the rest of the API surface, this pairs well with Node.js Security Best Practices for Safer API Development and a protected route design such as Build a REST API in Node.js with Express and JWT Auth.
What you will build
You will implement an Express middleware chain that checks each request against a Redis-backed counter before the request reaches your route handler. The rate limiter will:
- Count requests per client key within a time window
- Reject requests that exceed the configured limit
- Expose useful response headers so clients can adapt their retry behavior
- Work across multiple app instances because Redis stores the shared state
The final state should be easy to validate with curl, easy to tune by environment, and safe to fail in a predictable way when Redis is unavailable.
Prerequisites and stop-here checks
Before you start, make sure the following is true:
- You can run a Node.js application locally.
- You have access to a Redis instance that your application can reach.
- You know whether your API keys limits by IP address, authenticated user, API token, or a combination.
- You can change middleware behavior between development and production.
Stop here if these are not resolved
Do not proceed if you do not yet know the client identity strategy. A rate limiter only works well when the key is chosen intentionally. If you key only on IP, multiple users behind the same NAT may be grouped together. If you key only on user ID, unauthenticated endpoints may remain exposed. If you key on a request header that clients control, you may create a bypass.
Also stop here if Redis is not operationally acceptable in your deployment path. If you cannot reach Redis reliably, you need a fallback decision: fail closed, fail open, or bypass limiting in non-production. That choice affects availability and abuse resistance.
Prepare the Express application
Goal
Create a small Express API with one public endpoint so you can test the limiter in isolation.
Action
Install the dependencies you need:
npm install express redis
Create a basic server and a route that returns a predictable response:
const express = require('express');
const { createClient } = require('redis');

const app = express();
const port = process.env.PORT || 3000;

app.get('/health', (req, res) => {
  res.json({ status: 'ok' });
});

app.listen(port, () => {
  console.log(`Server listening on port ${port}`);
});
Expected output
You should have a working Express service with at least one endpoint that can be called repeatedly during testing.
Validation
Run the server and confirm the endpoint responds:
curl http://localhost:3000/health
Expected response:
{"status":"ok"}
Common failure
A common failure is testing the limiter against an endpoint that also has authentication, body parsing, or business logic bugs. Keep the first test route simple so any failures are caused by the middleware, not the route implementation.
Choose the rate limit strategy
Goal
Decide how requests will be counted and when the request window resets.
Action
For most operational use cases, start with a fixed window limit. It is straightforward to understand, easy to inspect, and sufficient for many abuse-control scenarios. A practical policy might be:
- 100 requests per 60 seconds for anonymous access
- A higher quota for authenticated users or internal clients
- A smaller limit for expensive endpoints
The key decision is how to identify a client. Common choices are:
req.ipfor simple public APIs- A user ID or API token subject for authenticated APIs
- A composite key like
userId:routefor expensive or sensitive endpoints
If you expect some endpoints to be far more expensive than others, do not use one global limit for everything. Apply different middleware instances per route group or per route.
Expected output
You should have a documented rule for who gets counted together and what limit applies.
Validation
Check the rule against your actual traffic model:
- Are multiple users behind the same proxy or NAT?
- Can authenticated and anonymous requests hit the same route?
- Do retries from clients or gateways amplify request counts?
Common failure
The most common design error is using the same key for everyone and then discovering that one high-volume caller starves the rest of the tenant, subnet, or office.
Implement Redis-backed counting middleware
Goal
Build middleware that increments a Redis counter for the chosen key and blocks requests that exceed the limit.
Action
Use Redis as shared state so multiple Node.js instances enforce the same counter. A simple implementation pattern is:
- Build a client key from the request.
- Increment the Redis counter.
- Set an expiry on the first increment so the counter resets after the window.
- Return HTTP 429 when the counter exceeds the limit.
Here is a practical example:
const express = require('express');
const { createClient } = require('redis');

const app = express();
const port = process.env.PORT || 3000;

const redisUrl = process.env.REDIS_URL || 'redis://localhost:6379';
const client = createClient({ url: redisUrl });

client.on('error', (err) => {
  console.error('Redis client error', err);
});

async function rateLimit(req, res, next) {
  try {
    const windowSeconds = 60;
    const maxRequests = 100;
    const key = `rl:${req.ip}`;

    const current = await client.incr(key);

    if (current === 1) {
      await client.expire(key, windowSeconds);
    }

    const ttl = await client.ttl(key);
    res.setHeader('X-RateLimit-Limit', String(maxRequests));
    res.setHeader('X-RateLimit-Remaining', String(Math.max(0, maxRequests - current)));
    res.setHeader('X-RateLimit-Reset', String(ttl > 0 ? ttl : windowSeconds));

    if (current > maxRequests) {
      return res.status(429).json({
        error: 'Too Many Requests',
        retryAfterSeconds: ttl > 0 ? ttl : windowSeconds
      });
    }

    return next();
  } catch (err) {
    return next(err);
  }
}

async function start() {
  await client.connect();

  app.use('/api', rateLimit);

  app.get('/api/health', (req, res) => {
    res.json({ status: 'ok' });
  });

  app.listen(port, () => {
    console.log(`Server listening on port ${port}`);
  });
}

start().catch((err) => {
  console.error(err);
  process.exit(1);
});
Expected output
Requests to /api/health should succeed until the request count exceeds the configured limit, after which the server should return HTTP 429.
Validation
Call the endpoint repeatedly and inspect the headers:
for i in $(seq 1 3); do
  curl -i http://localhost:3000/api/health
  echo
 done
You should see X-RateLimit-* headers and, once the limit is exceeded, a 429 response.
Common failure
A common failure is forgetting to set an expiry on the first increment. Without a TTL, keys can accumulate forever, and the count never resets.
Make the limiter safer for real traffic
Goal
Reduce the chance of incorrect blocking and define what happens when Redis is unavailable.
Action
Review these operational choices before production:
- Fail mode: decide whether a Redis error should block the request or bypass the limiter.
- Key selection: use a stable identifier that cannot be spoofed.
- Scope: apply stricter limits only to routes that actually need them.
- Headers: expose enough information for legitimate clients to back off.
- Proxy awareness: if your app sits behind a reverse proxy, make sure IP extraction is configured correctly.
For authenticated APIs, a request key based on user identity is often more precise than IP-based limiting. For public endpoints, IP-based limiting is usually acceptable but must be tested behind load balancers and NAT.
Expected output
You should have a rate limiting policy that matches the route sensitivity and your failure tolerance.
Validation
Confirm these questions are answered before production use:
- What happens if Redis is slow or down?
- Which requests are counted together?
- What is the reset interval?
- Are 429 responses visible in logs and metrics?
Common failure
The most common production issue is not the limit itself; it is counting the wrong identity because proxy headers or auth context were not interpreted correctly.
Validate the limiter under repeatable test conditions
Goal
Verify that the limiter behaves as expected with both normal and excessive request volumes.
Action
Use a simple loop or a load tool to send repeated requests. Start with a low temporary limit if you want faster feedback during testing.
for i in $(seq 1 5); do
  curl -s -o /dev/null -w "%{http_code} %{header:X-RateLimit-Remaining}\n" http://localhost:3000/api/health
 done
Then observe three outcomes:
- Responses below the threshold return 200.
- The remaining count decreases predictably.
- The first request after the threshold returns 429.
If you want to test a distributed setup, run the app on two different instances pointing to the same Redis database and repeat the same request pattern from both. The shared Redis counter should keep the combined traffic under one limit.
Expected output
You should be able to reproduce the limit consistently and confirm that all instances see the same shared state.
Validation
Verify that:
- The reset occurs after the TTL expires.
- Repeated requests from one client do not affect unrelated clients if your keying strategy separates them.
- The rate limiter does not block requests before the configured threshold.
Common failure
A common failure during validation is testing through a proxy, gateway, or browser cache without realizing that the client identity is being changed or hidden. Always test the same path your production traffic uses.
Operational follow-up before production
Goal
Turn the implementation into a controllable production safeguard rather than a one-off code sample.
Action
Before release, verify the following in staging:
- Redis latency is acceptable under expected request volume.
- The app handles Redis reconnects in the way you chose.
- Logs clearly show 429 events and Redis failures.
- The limit values are configured from environment variables or deployment settings.
- The middleware is applied only where the policy should exist.
If the limit protects authenticated endpoints, ensure your auth middleware runs before you derive a user-based limit key. If the limit protects a public route, ensure the key comes from a trustworthy source such as a normalized client IP behind a known proxy chain.
Expected output
You should have a limiter that can be tuned without code changes and observed with standard logs and headers.
Validation
Run one final checklist in staging:
- Can a legitimate client exceed the limit only after the configured threshold?
- Do 429 responses include enough information for retry behavior?
- Are the counters shared across instances?
- Does the application fail in the way you intended when Redis is unavailable?
Common failure
A common failure is shipping a working limiter that cannot be operated. If you cannot change its threshold, see its effect, and interpret its errors, it will be difficult to trust under pressure.
Final takeaway
Redis-backed rate limiting with Express middleware gives you a practical, shared control point for API abuse prevention in Node.js. The important part is not just incrementing a counter; it is choosing the right identity key, setting a reliable expiry, validating the behavior under repeated requests, and deciding how the service should behave when Redis is unhealthy. If you can explain those decisions and reproduce the 429 response in staging, you have a limiter that is ready for careful production rollout.
Use this guidance together with JWT authentication in ASP.NET Core to connect the workflow with related operational context already available on the site.
Part of the Programming: Node.js Insights content cluster.